Mastering DNS Privacy: Pi-hole + Unbound. (Part 2)
Pi-hole is a powerful network-wide ad blocker that also functions as a DNS sinkhole. It blocks unwanted content, enhances privacy, and speeds up your browsing experience by preventing ads, trackers, and malicious domains from even loading.


Pi-hole + Unbound enhances privacy by blocking ads, trackers, and malicious domains while preventing ISP snooping, DNS hijacking, and censorship. Unlike third-party resolvers such as Google DNS, Cloudflare, or ISP-provided DNS, Unbound operates recursively, ensuring complete independence and security. With DNSSEC validation and intelligent caching, browsing becomes faster, safer, and free from manipulation—delivering seamless, private, and reliable connectivity.
Step 5. Configure DNS Settings
- Navigate to Settings > DNS in the Pi-hole admin interface.
- Select your preferred upstream DNS servers

or enter custom ones.

- Ensure to use DNSSEC for additional security.
- Save changes; restart Pi-hole and check its status:
$ sudo systemctl restart pihole-FTL
$ sudo systemctl status pihole-FTL
This command restarts the FTL (Fast, Tokenized Lookups) engine, which is responsible for DNS resolution and blocking.
Custom DNS servers
[Your Pi-hole IP]#5353
Using [Your Pi-hole IP]#5353 specifies that DNS queries should be sent to the IP address [You Ip-hole IP] on port 5353 instead of the default DNS port 53.
Here's why:
Why Use Port 5353 with Pi-hole?
1. Port Conflict Avoidance: If another service (e.g., systemd-resolved) is using the default DNS port 53, using port 5353 prevents conflicts.
2. Custom DNS Setup: It allows Pi-hole to forward DNS requests to a custom DNS resolver or service running on the same machine, like a caching DNS server.
3. Network Flexibility: Useful in advanced network setups where different DNS servers are needed for different purposes, ensuring Pi-hole can route queries as desired.
4. Security and Control: It offers more control over DNS routing and enhances security by isolating DNS query handling to a non-standard port.
Step 6. Allow UFW for Port 5353
This ensures that devices on your local network can reach the DNS resolver securely and without interruption.
$ sudo ufw allow from 192.168.1.0/24 to any port 5353
$ sudo ufw reload
Step 7. Point Devices to Pi-hole
To make Pi-hole the primary DNS server on your network, you have (2) two options:
a. Set Pi-hole as the Primary DNS on Your Router
• Go to your router's administration page (usually by entering its IP address in a web browser).
• Navigate to the DNS settings section.
• Set Pi-hole's IP address (e.g., 192.168.1.3) as the Primary DNS Server.
• Save the changes and restart the router if necessary.
• This method routes all network devices' DNS queries through Pi-hole, giving you centralized control.
Pros:
Centralized control—no need to configure each device individually.
Automatically covers new devices joining the network.
Cons:
Limited device-level customization.
Some routers may bypass custom DNS settings.
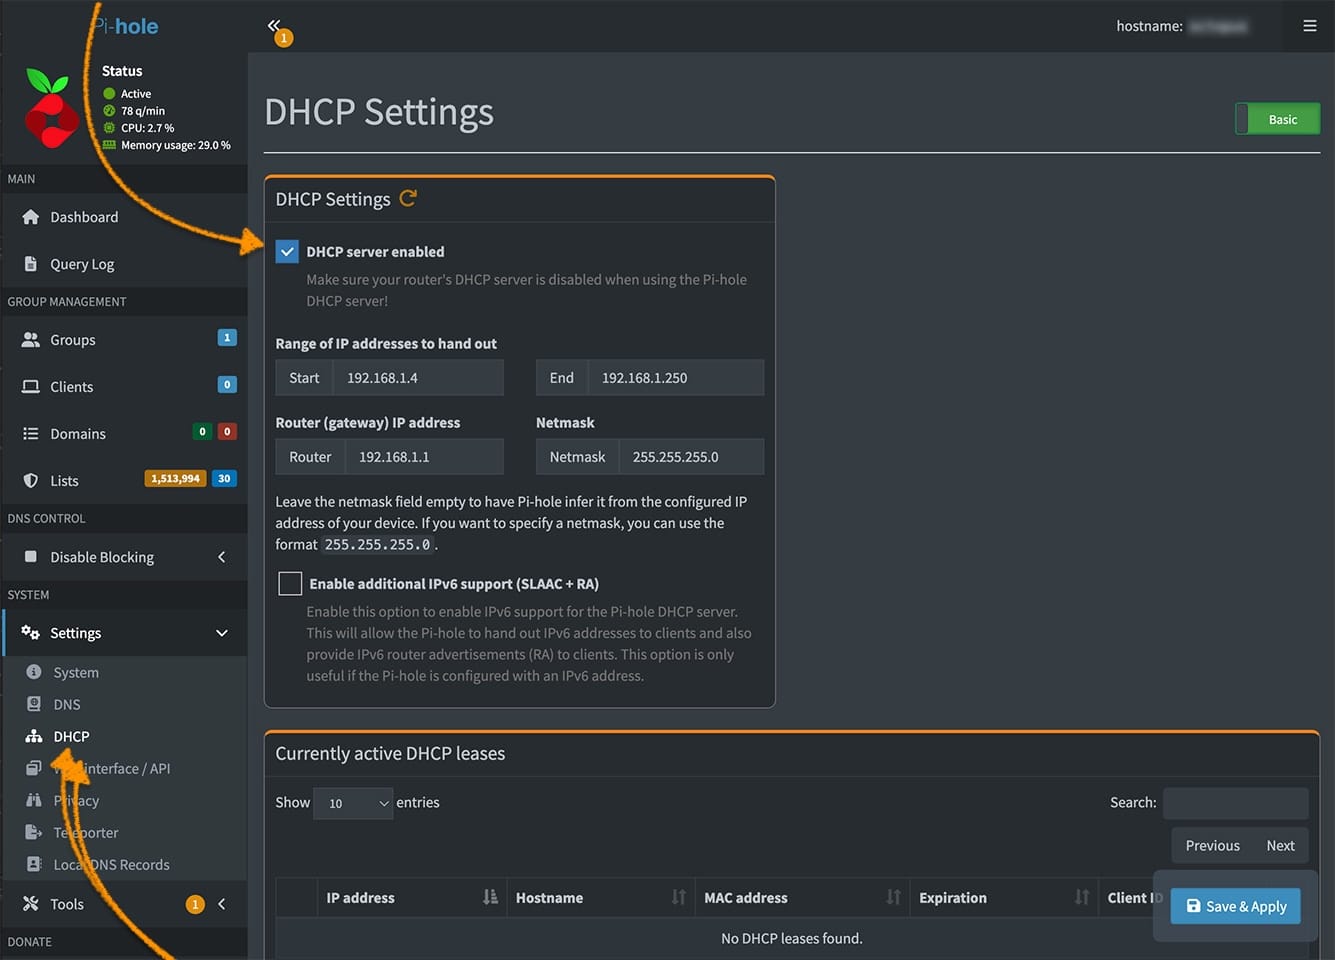
b. Use Pi-hole's Built-In DHCP Server
Disable your router's DHCP and enable Pi-hole's DHCP, allowing Pi-hole to assign IP addresses and DNS settings.
Pros:
Full control over DNS and network traffic monitoring.
Device-level customization (e.g., static IP assignments).
Cons:
More complex setup and maintenance.
Requires disabling the router's DHCP function.
Which to Choose?
Router DNS Setting: Easier setup, suitable for most users wanting network-wide ad blocking.
Pi-hole DHCP: Ideal for advanced users needing detailed control and customization.
Does Pi-hole become your main DNS Server after this?
Yes! —- by configuring either of the above:
• All DNS traffic from the devices using Pi-hole as their DNS server will be routed through Pi-hole.
• Pi-hole will filter ads and unwanted content before resolving the DNS queries.
• If paired with Unbound (or another upstream DNS), Pi-hole forwards queries to it for resolution, ensuring privacy and security.
Step 8: Test and Maintain Pi-hole

- Test the setup by visiting ad-heavy websites; ads should be blocked.
- Check Pi-hole's query log under Query Log in the admin interface.
- Regularly update Pi-hole with:
$ sudo pihole -upStep 9. Test the Configuration
Verify Pi-hole is correctly resolving domains:
$ dig @[Your Pi-hole IP] -p 5335 snubmonkey.com
Explanation:
• @: Specifies the DNS server to query. In this case, it's your Pi-hole's IP address.
• -p 5335: Specifies the port. If you've configured Pi-hole to forward DNS queries to a different port (like 5335), this ensures the query goes through the right one.
• snubmonkey.com: The domain you're testing the resolution for.
You should see a status: NOERROR response, confirming successful recursion as such:
; <<>> DiG 9.18.30-0ubuntu0.22.04.2-Ubuntu <<>> @192.168.1.x snubmonkey.com -p 5353
; (1 server found)
;; global options: +cmd
;; Got answer:
;; ->>HEADER<<- opcode: QUERY, status: NOERROR, id: 9540
;; flags: qr rd ra; QUERY: 1, ANSWER: 1, AUTHORITY: 0, ADDITIONAL: 1

;; OPT PSEUDOSECTION:
; EDNS: version: 0, flags:; udp: 1232
;; QUESTION SECTION:
;snubmonkey.com.			IN	A

;; ANSWER SECTION:
snubmonkey.com.		432	IN	A	41.66.41.12

;; Query time: 0 msec
;; SERVER: 192.168.1.17#5353(192.168.1.x) (UDP)
;; WHEN: Mon Feb 24 19:07:18 UTC 2025
;; MSG SIZE  rcvd: 59
Check Unbound logs:
$ sudo journalctl -u unbound -f
The command sudo journalctl -u unbound -f does the following:
-u unbound: Filters the logs to show only entries related to the Unbound service.-f: Follows the log in real-time, similar to tail -f, allowing you to see new log entries as they occur.
This is useful for monitoring Unbound's activity, troubleshooting issues, or verifying configuration changes as they happen.
result:
...
..
.
Feb 24 19:12:18 pi.hole unbound[2514]: [1740424338] unbound[2514:0] info: 192.168.1.x SF16-iES-MusIC-va.tiKTOKcDn.CoM. A IN NOERROR 0.294769 0 241
Feb 24 19:12:43 pi.hole unbound[2514]: [1740424363] unbound[2514:0] info: 192.168.1.xxx snubmonkey.com. A IN
Feb 24 19:12:43 pi.hole unbound[2514]: [1740424363] unbound[2514:0] info: 192.168.1.xxx snubmonkey.com. A IN NOERROR 0.000000 1 59
Feb 24 19:12:43 pi.hole unbound[2514]: [1740424363] unbound[2514:0] info: 192.168.1.x lb._dns-SD._UDp.0.1.168.192.in-ADdR.aRPa. PTR IN
Feb 24 19:12:43 pi.hole unbound[2514]: [1740424363] unbound[2514:0] info: 192.168.1.x lb._dns-SD._UDp.0.1.168.192.in-ADdR.aRPa. PTR IN NXDOMAIN 0.000000 1 128
Feb 24 19:12:43 pi.hole unbound[2514]: [1740424363] unbound[2514:0] info: 192.168.1.x 29-COuriEr.pusH.apPLE.CoM. A IN
Feb 24 19:12:44 pi.hole unbound[2514]: [1740424364] unbound[2514:0] info: 192.168.1.x 29-COuriEr.pusH.apPLE.CoM. A IN NOERROR 0.180744 0 193
Feb 24 19:12:45 pi.hole unbound[2514]: [1740424365] unbound[2514:0] info: 192.168.1.x SiGNAlEr-PA.ClientS6.google.COm. HTTPS IN
Feb 24 19:12:45 pi.hole unbound[2514]: [1740424365] unbound[2514:0] info: 192.168.1.x SiGNAlEr-PA.ClientS6.google.COm. HTTPS IN NOERROR 0.000000 1 110
...
.
Step 10. Enhancing Pi-hole with The Big Blocklist Collection
To maximize the effectiveness of Pi-hole's ad-blocking capabilities, consider integrating The Big Blocklist Collection. These curated lists are designed to filter out ads, trackers, malware, and more, ensuring a cleaner and safer browsing experience.
Here's how to do it:
Step 1: Choose Your Blocklists
Head over to either of these trusted platforms:
Types of Lists:
Ticked Lists: Ideal for minimal maintenance, reducing false positives.
Other Lists: Tailored for advanced users wanting comprehensive filtering.
Step 2: Add Lists to Pi-hole
1. Access Pi-hole's Admin Panel:
Open your browser and go to: http://[Your Pi-hole IP]/admin
2. Navigate to Add blocklist:
• Go to Lists → Adlists.
• Copy and paste your preferred blocklist URLs from Firebog into the Address field.
• Click Add blocklist for each URL.
Step 3: Update Gravity
After adding the new lists, you must update Pi-hole's gravity database to apply the changes.
$ sudo pihole -gThis updates Pi-hole's blocklist sources, ensuring all new domains are actively filtered.
Step 4: Automate Updates (Optional)
To keep your blocklists up-to-date automatically, you can set up a cron job. This ensures you're always protected with the latest filters.
Example cron job (runs every 2 days):
$ sudo crontab -eadd the following line:
0 4 */2 * * pihole -gThis schedules Pi-hole to update its gravity list every 2 days at 4:00 AM.
Explanation:
• 0 4 → Runs at 4:00 AM.
• */2 → Every 2 days.
• * * → Every month and weekday.
• pihole -g → Command to update Pi-hole's gravity list.
Don't stop now! [Part 3 awaits.]
This wraps up our two-part series on mastering DNS privacy. Keep fine-tuning your setup, staying ahead of threats, and taking full control of your online experience. Your internet, your rules. Regularly updating blocklists maintains ongoing protection. With this setup, you gain full control over your network's security and digital experience.
Stay secure. Stay curious.
Stay SNUBbed!
